Living Room Winter Makeover

I'm so excited to finally share our living room makeover! I mentioned previously that we were doing a small refresh to our living room, with a new couch and rug, and I'm finally finished!

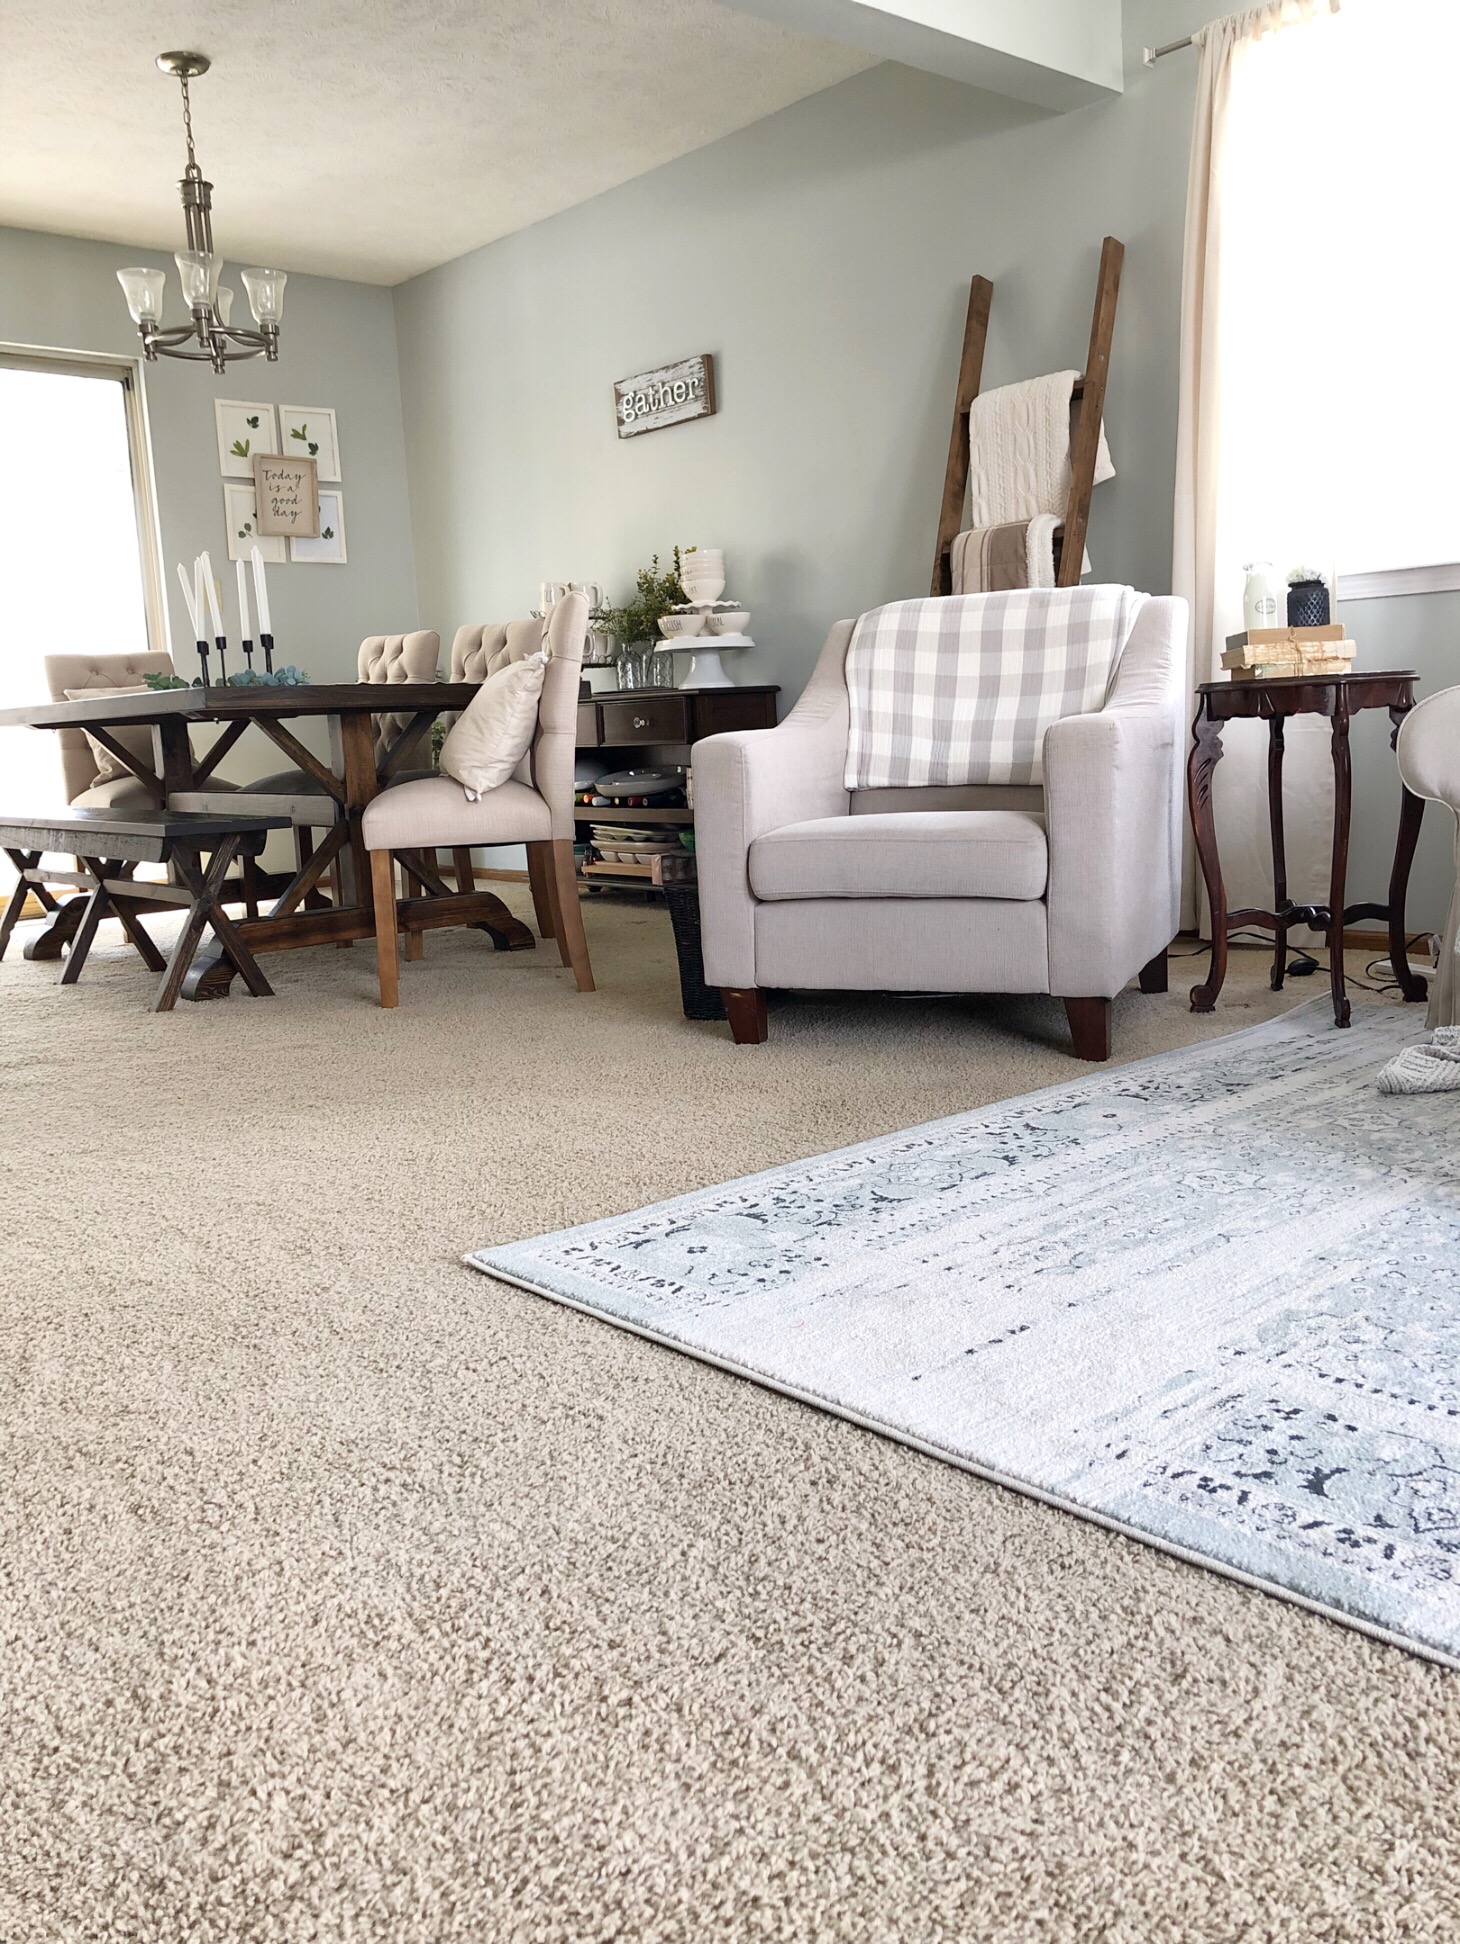
I wanted to go with a relaxing vibe, with soft neutrals and blues. For winter, I also incorporated texture, instead of a lot of color. I wanted the room to feel comfortable and calming. Here is our living room now!

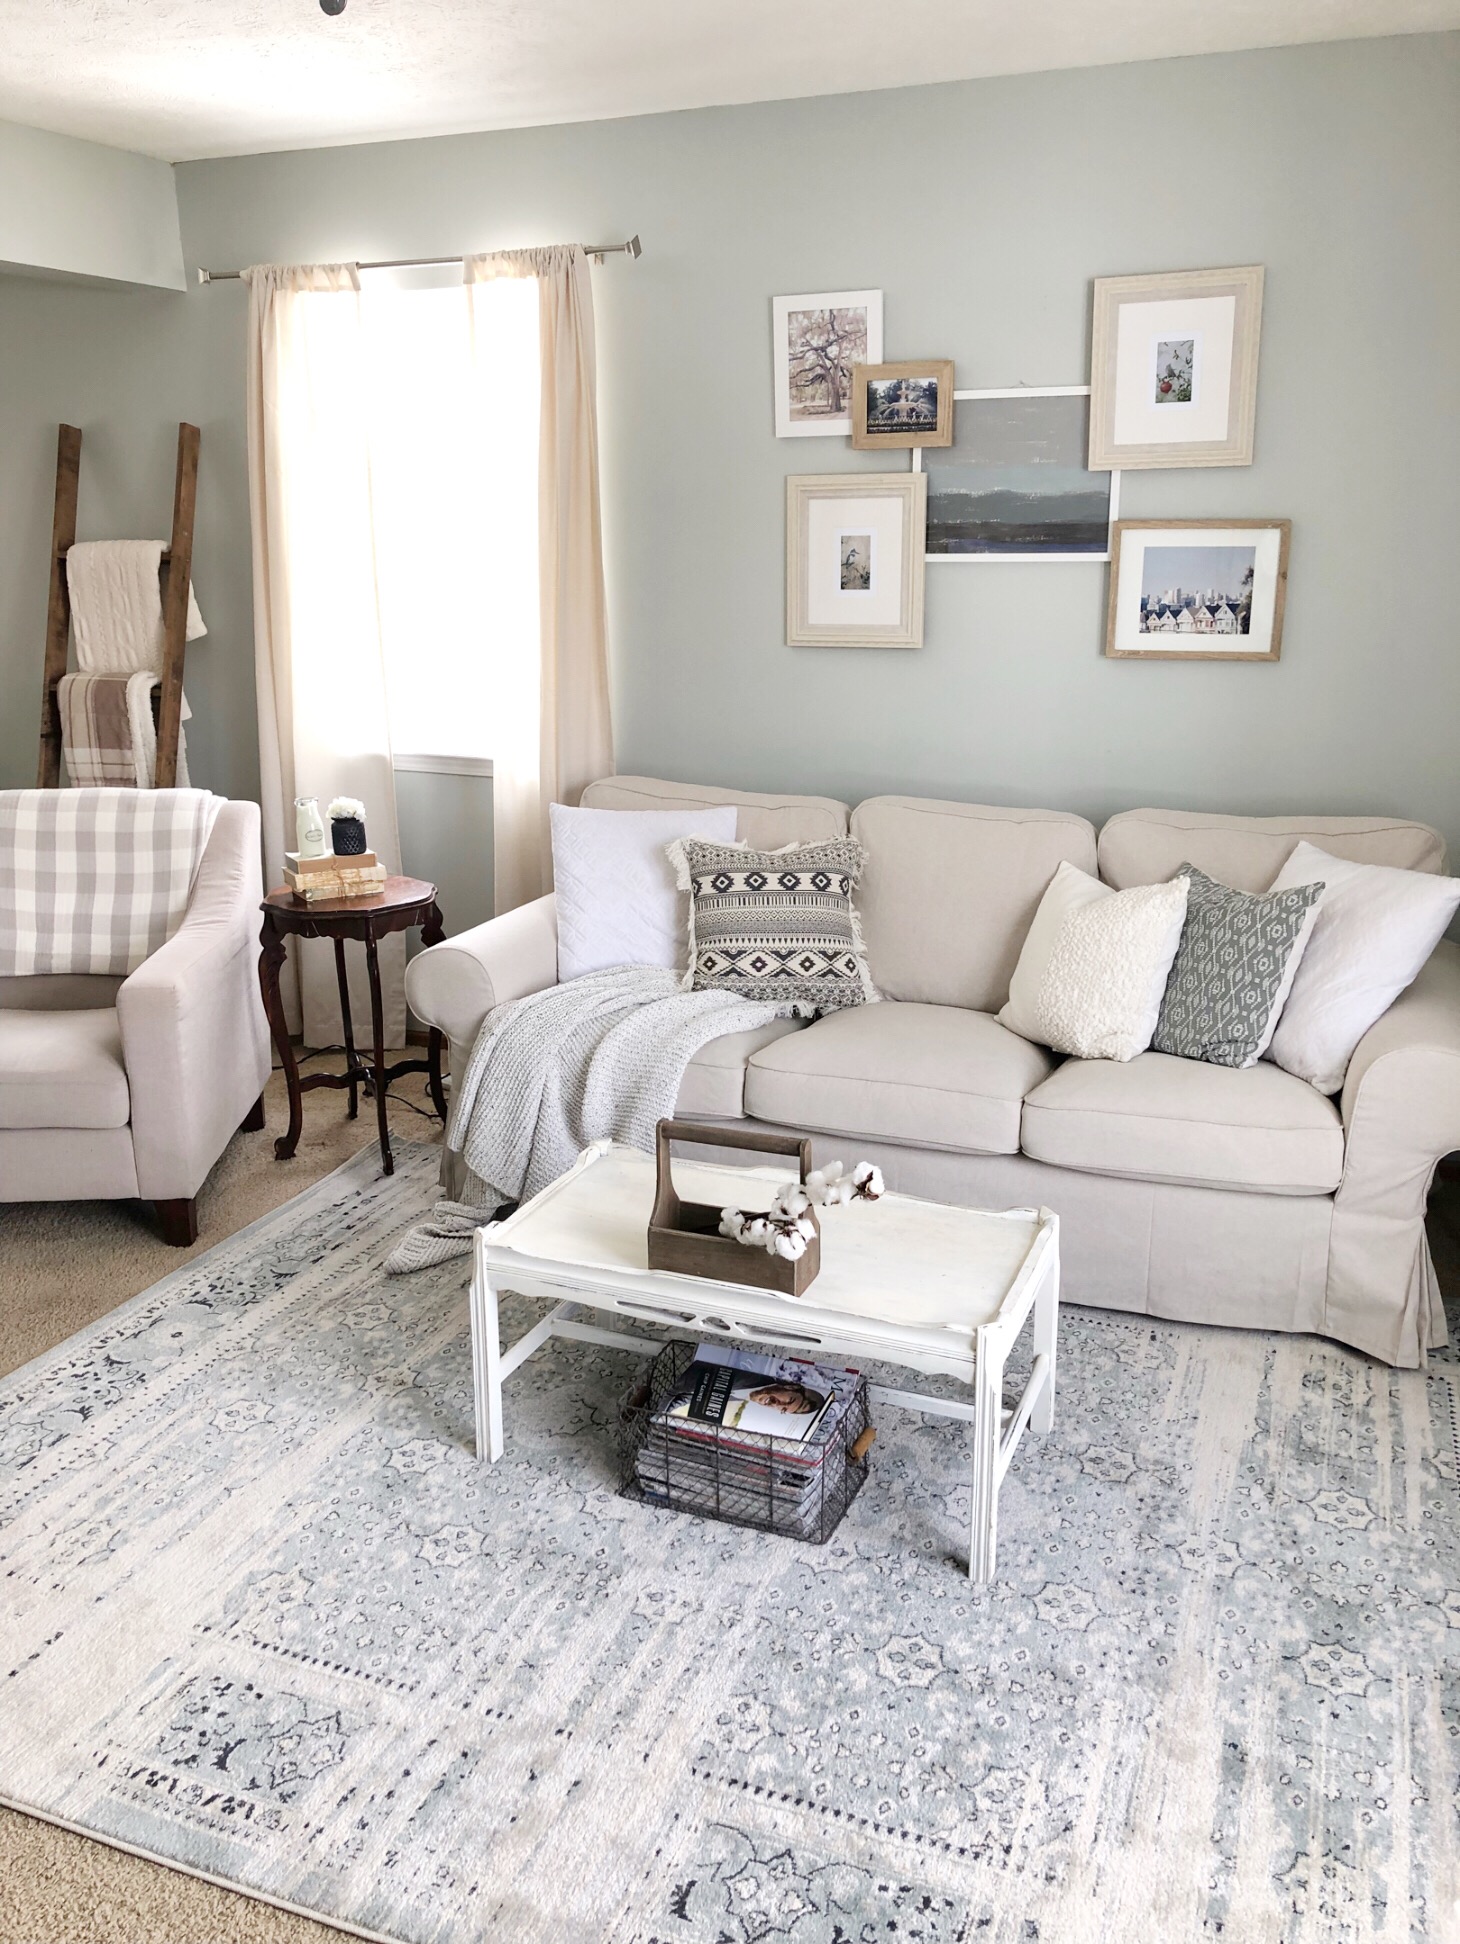
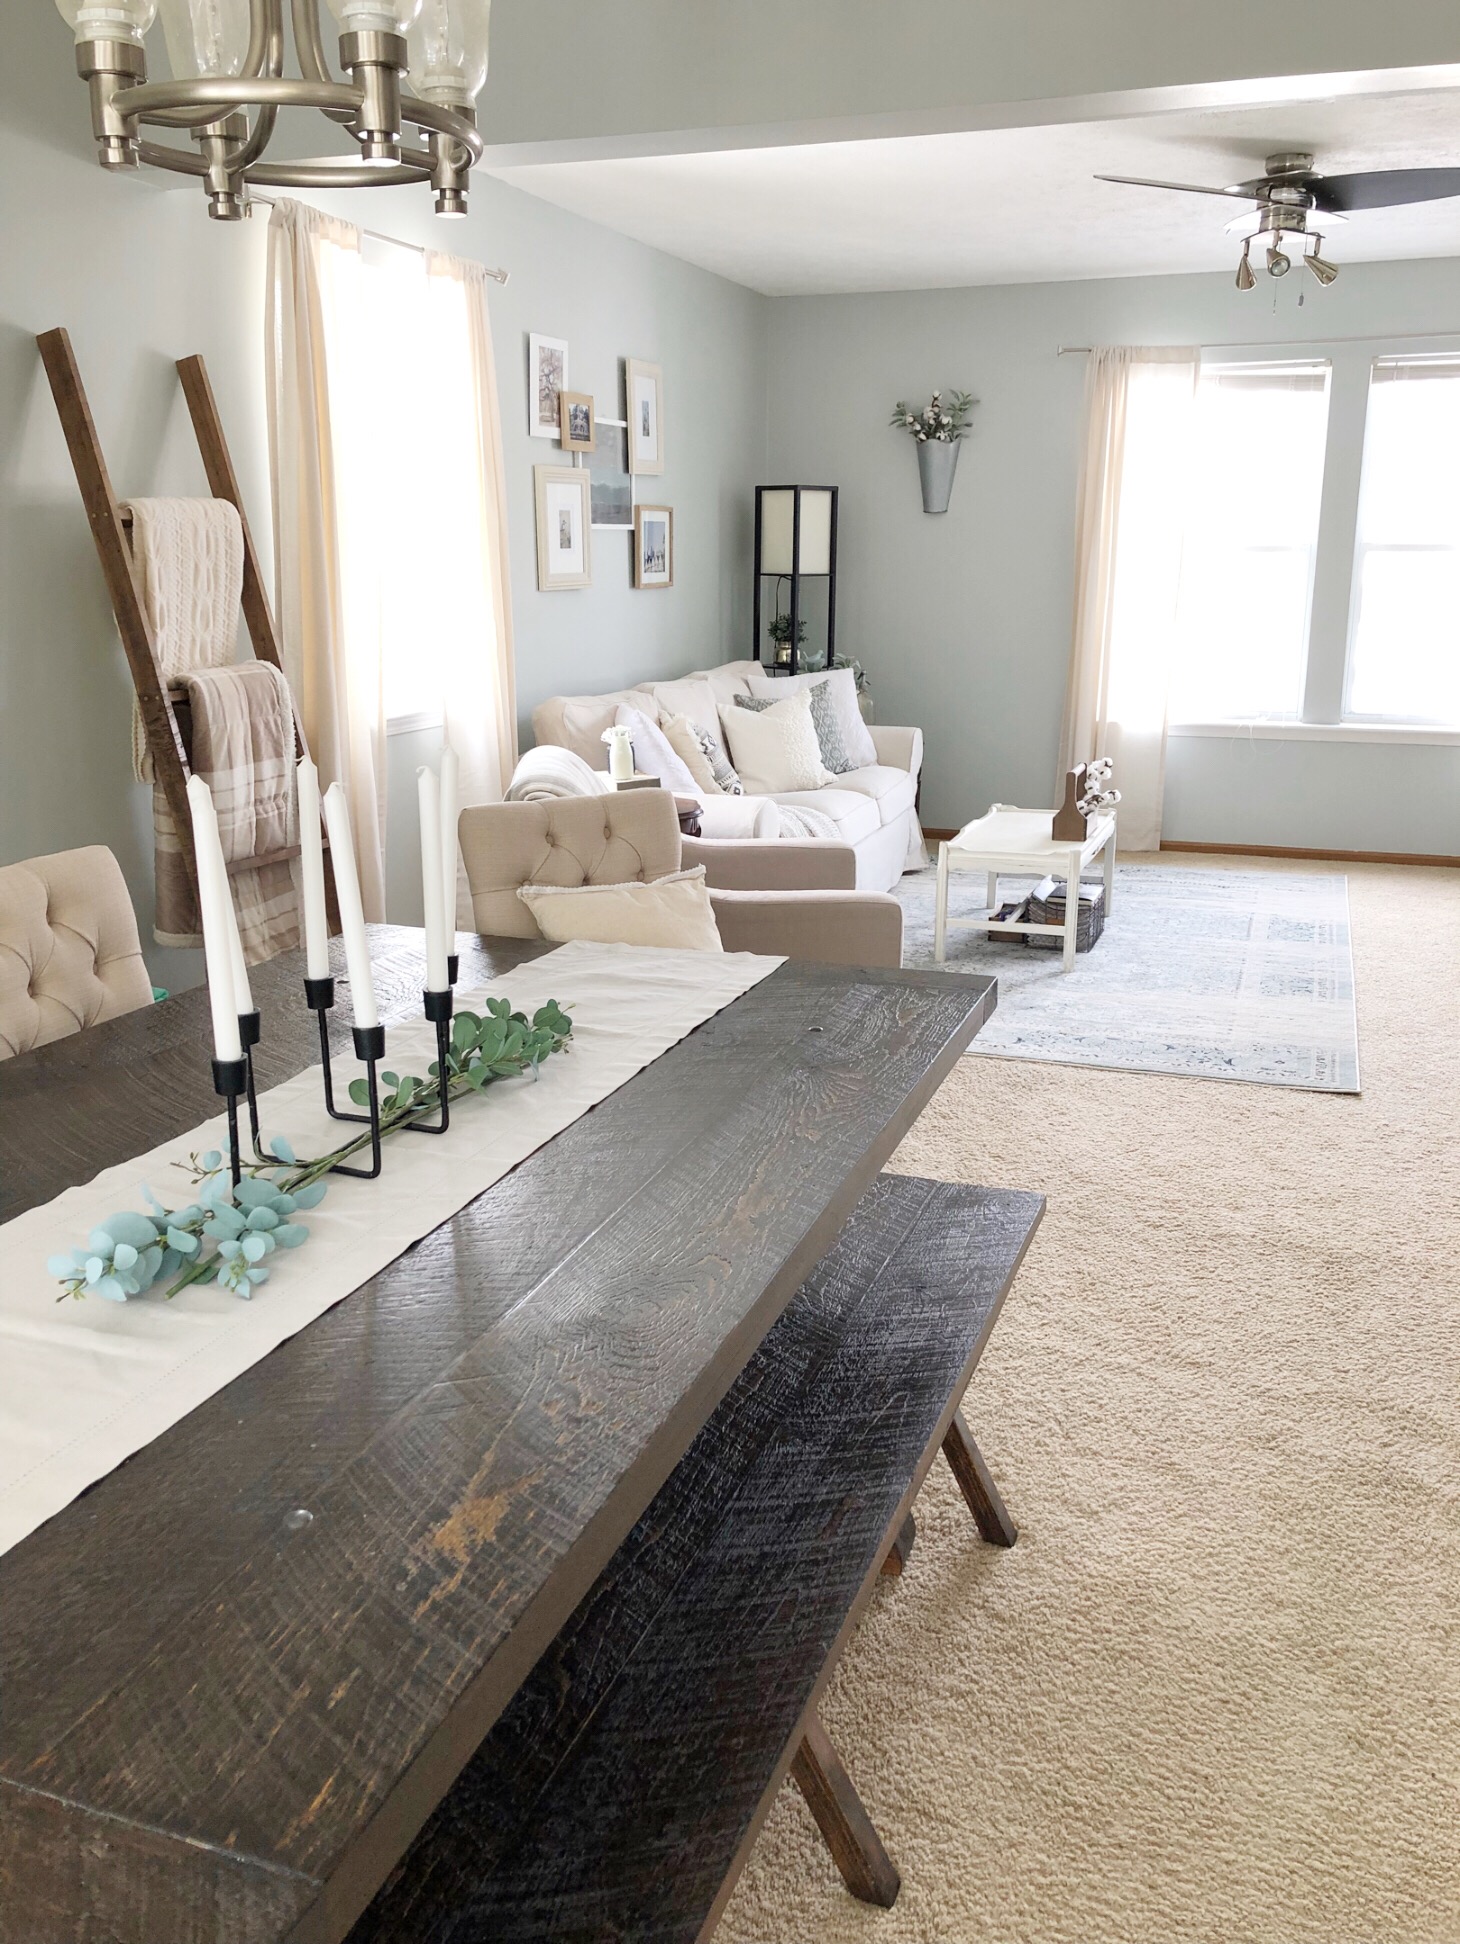
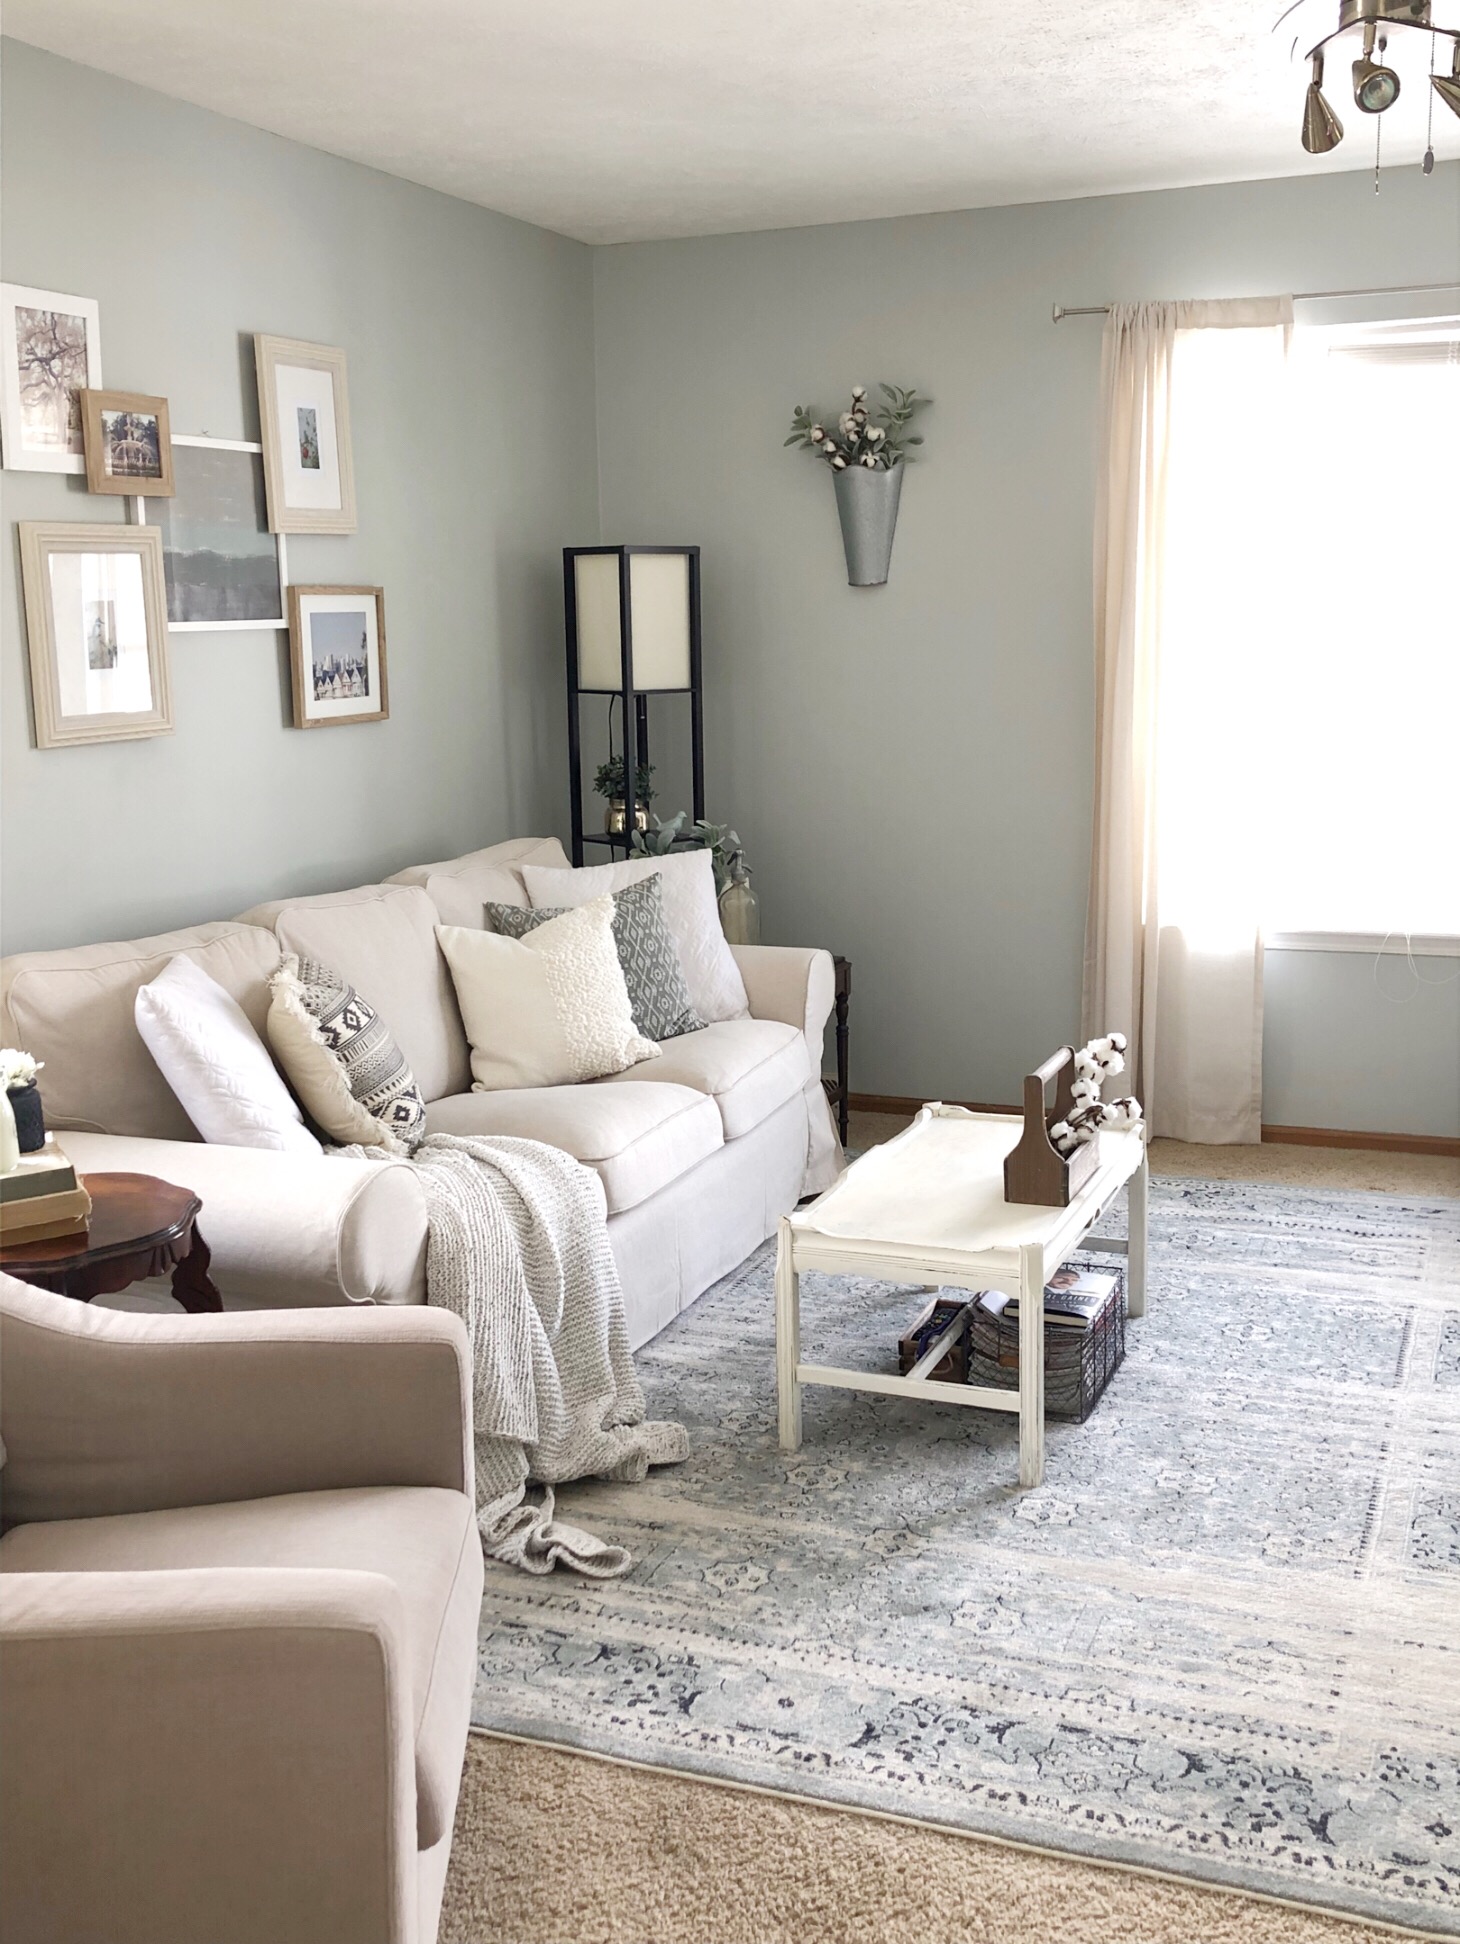
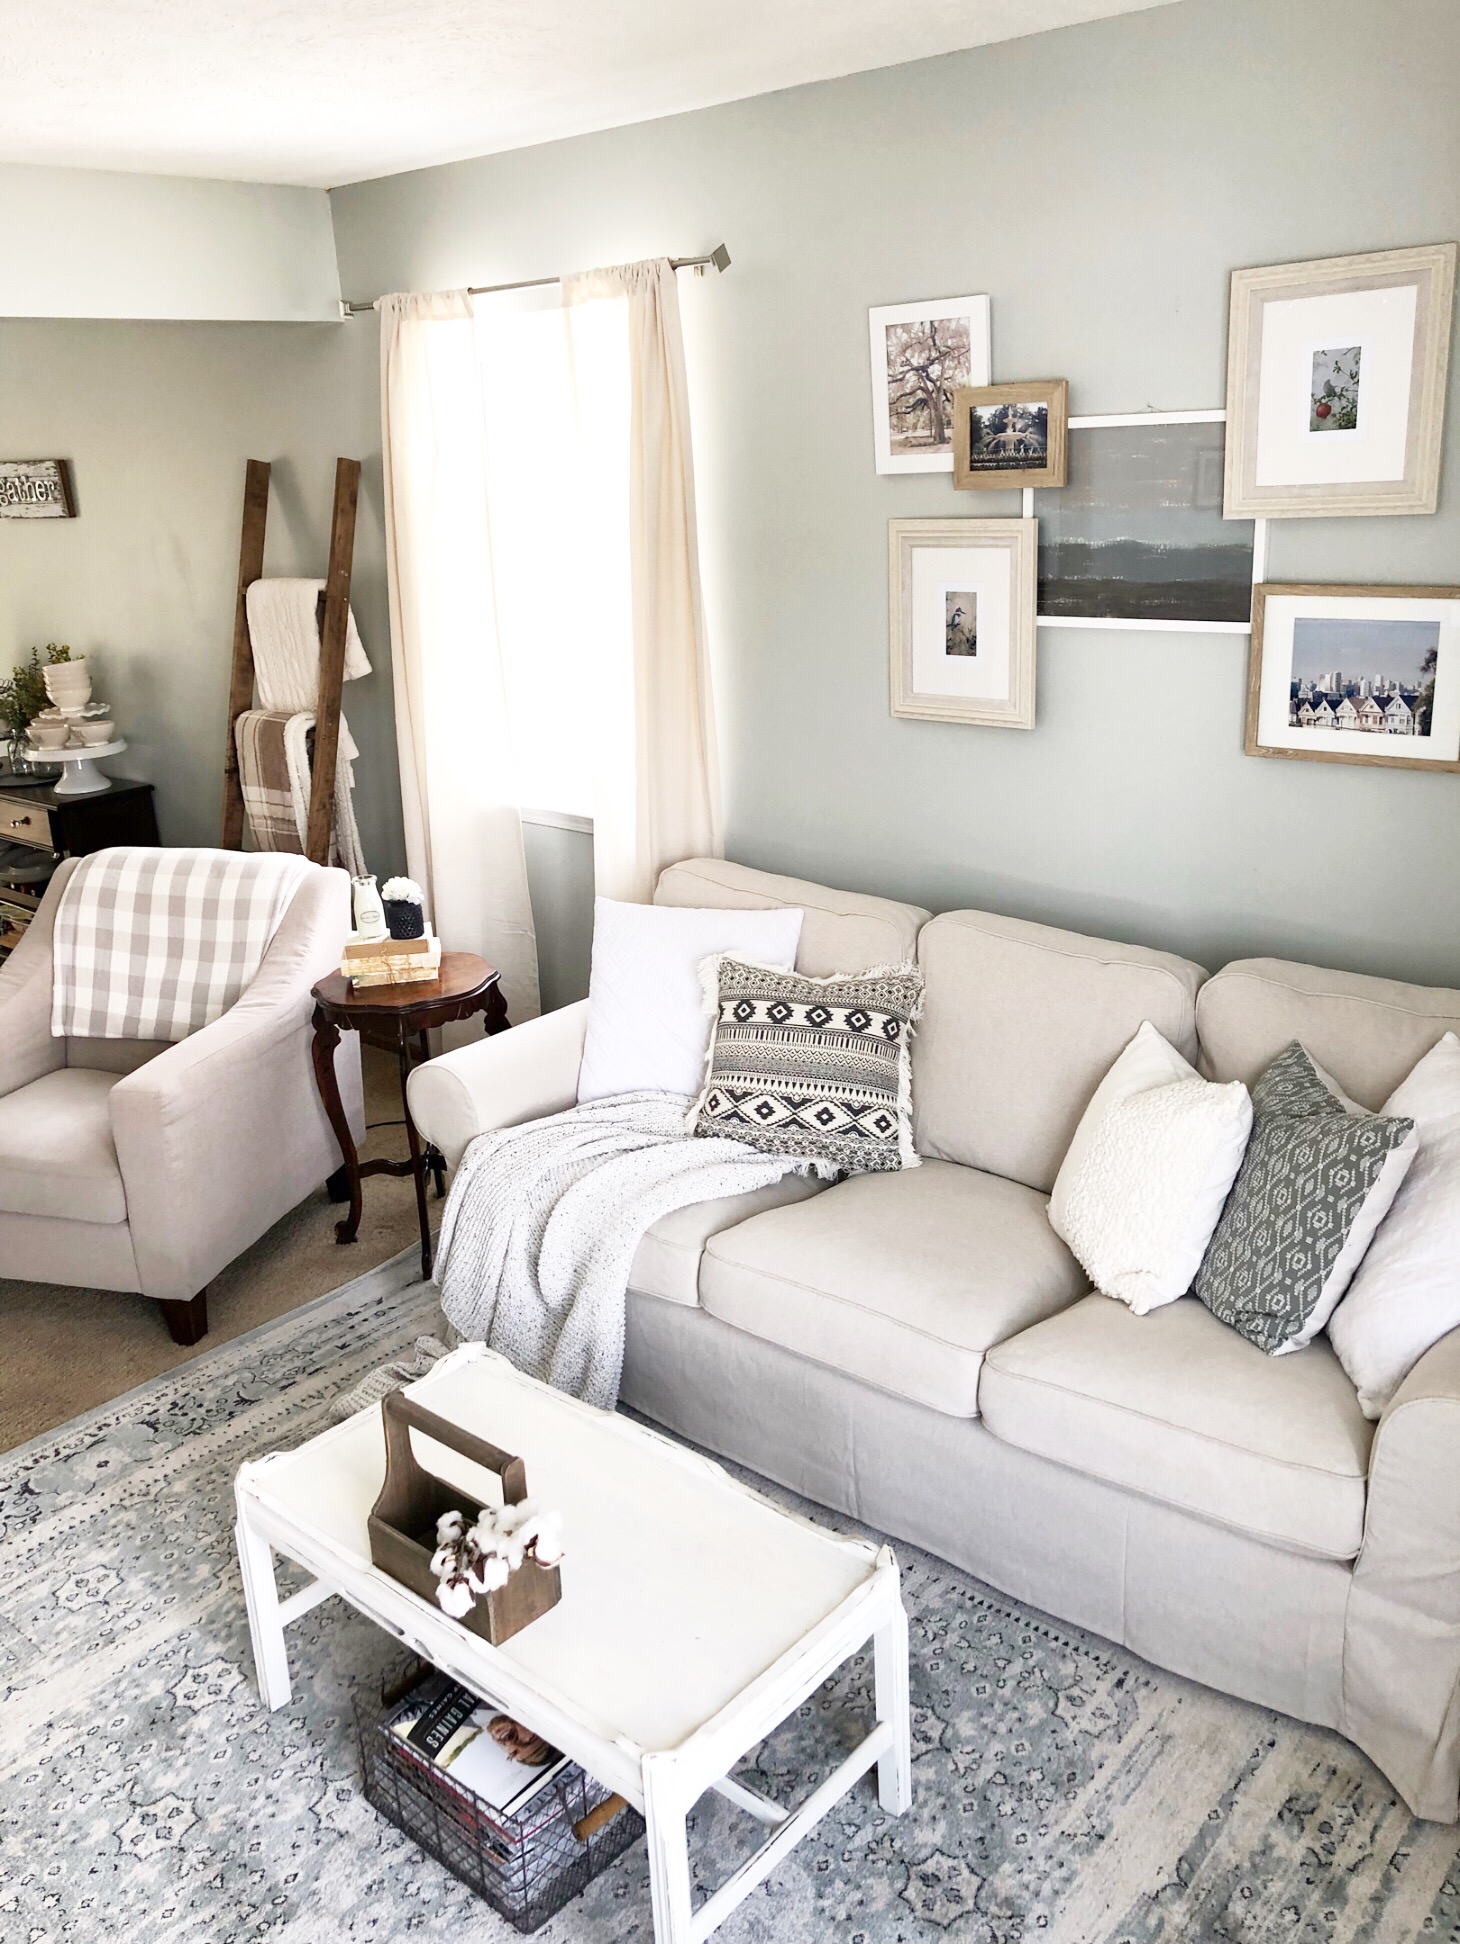
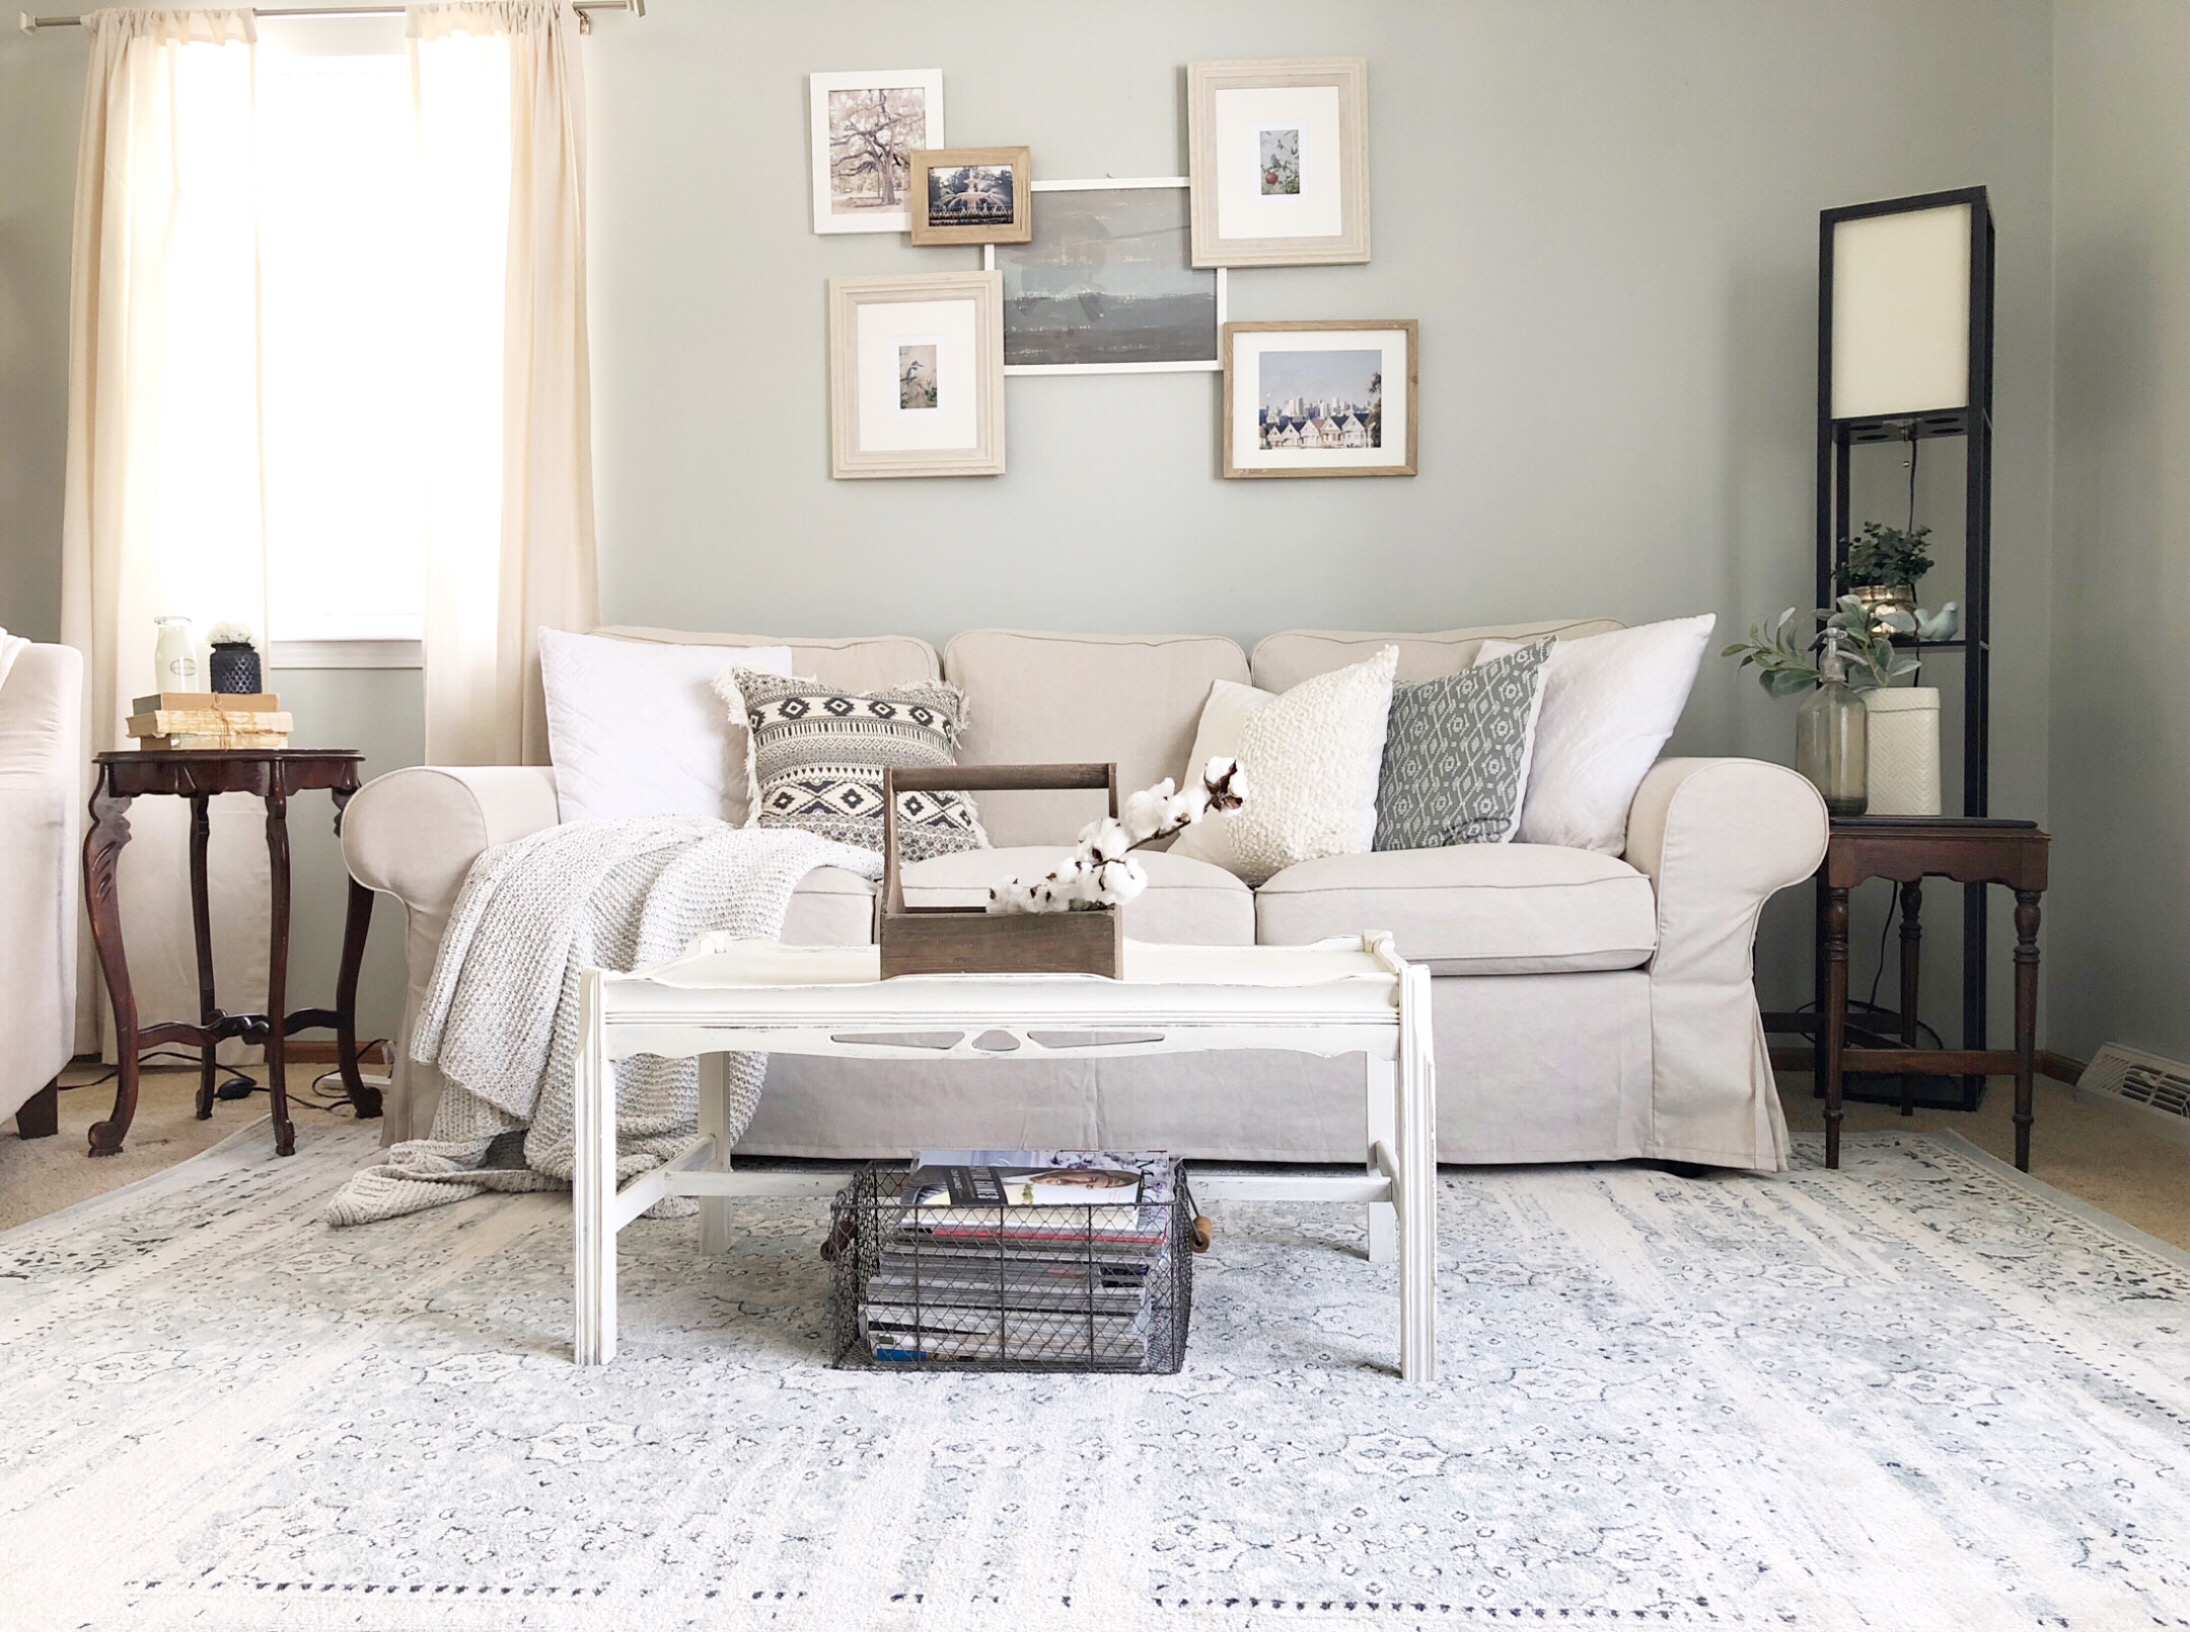
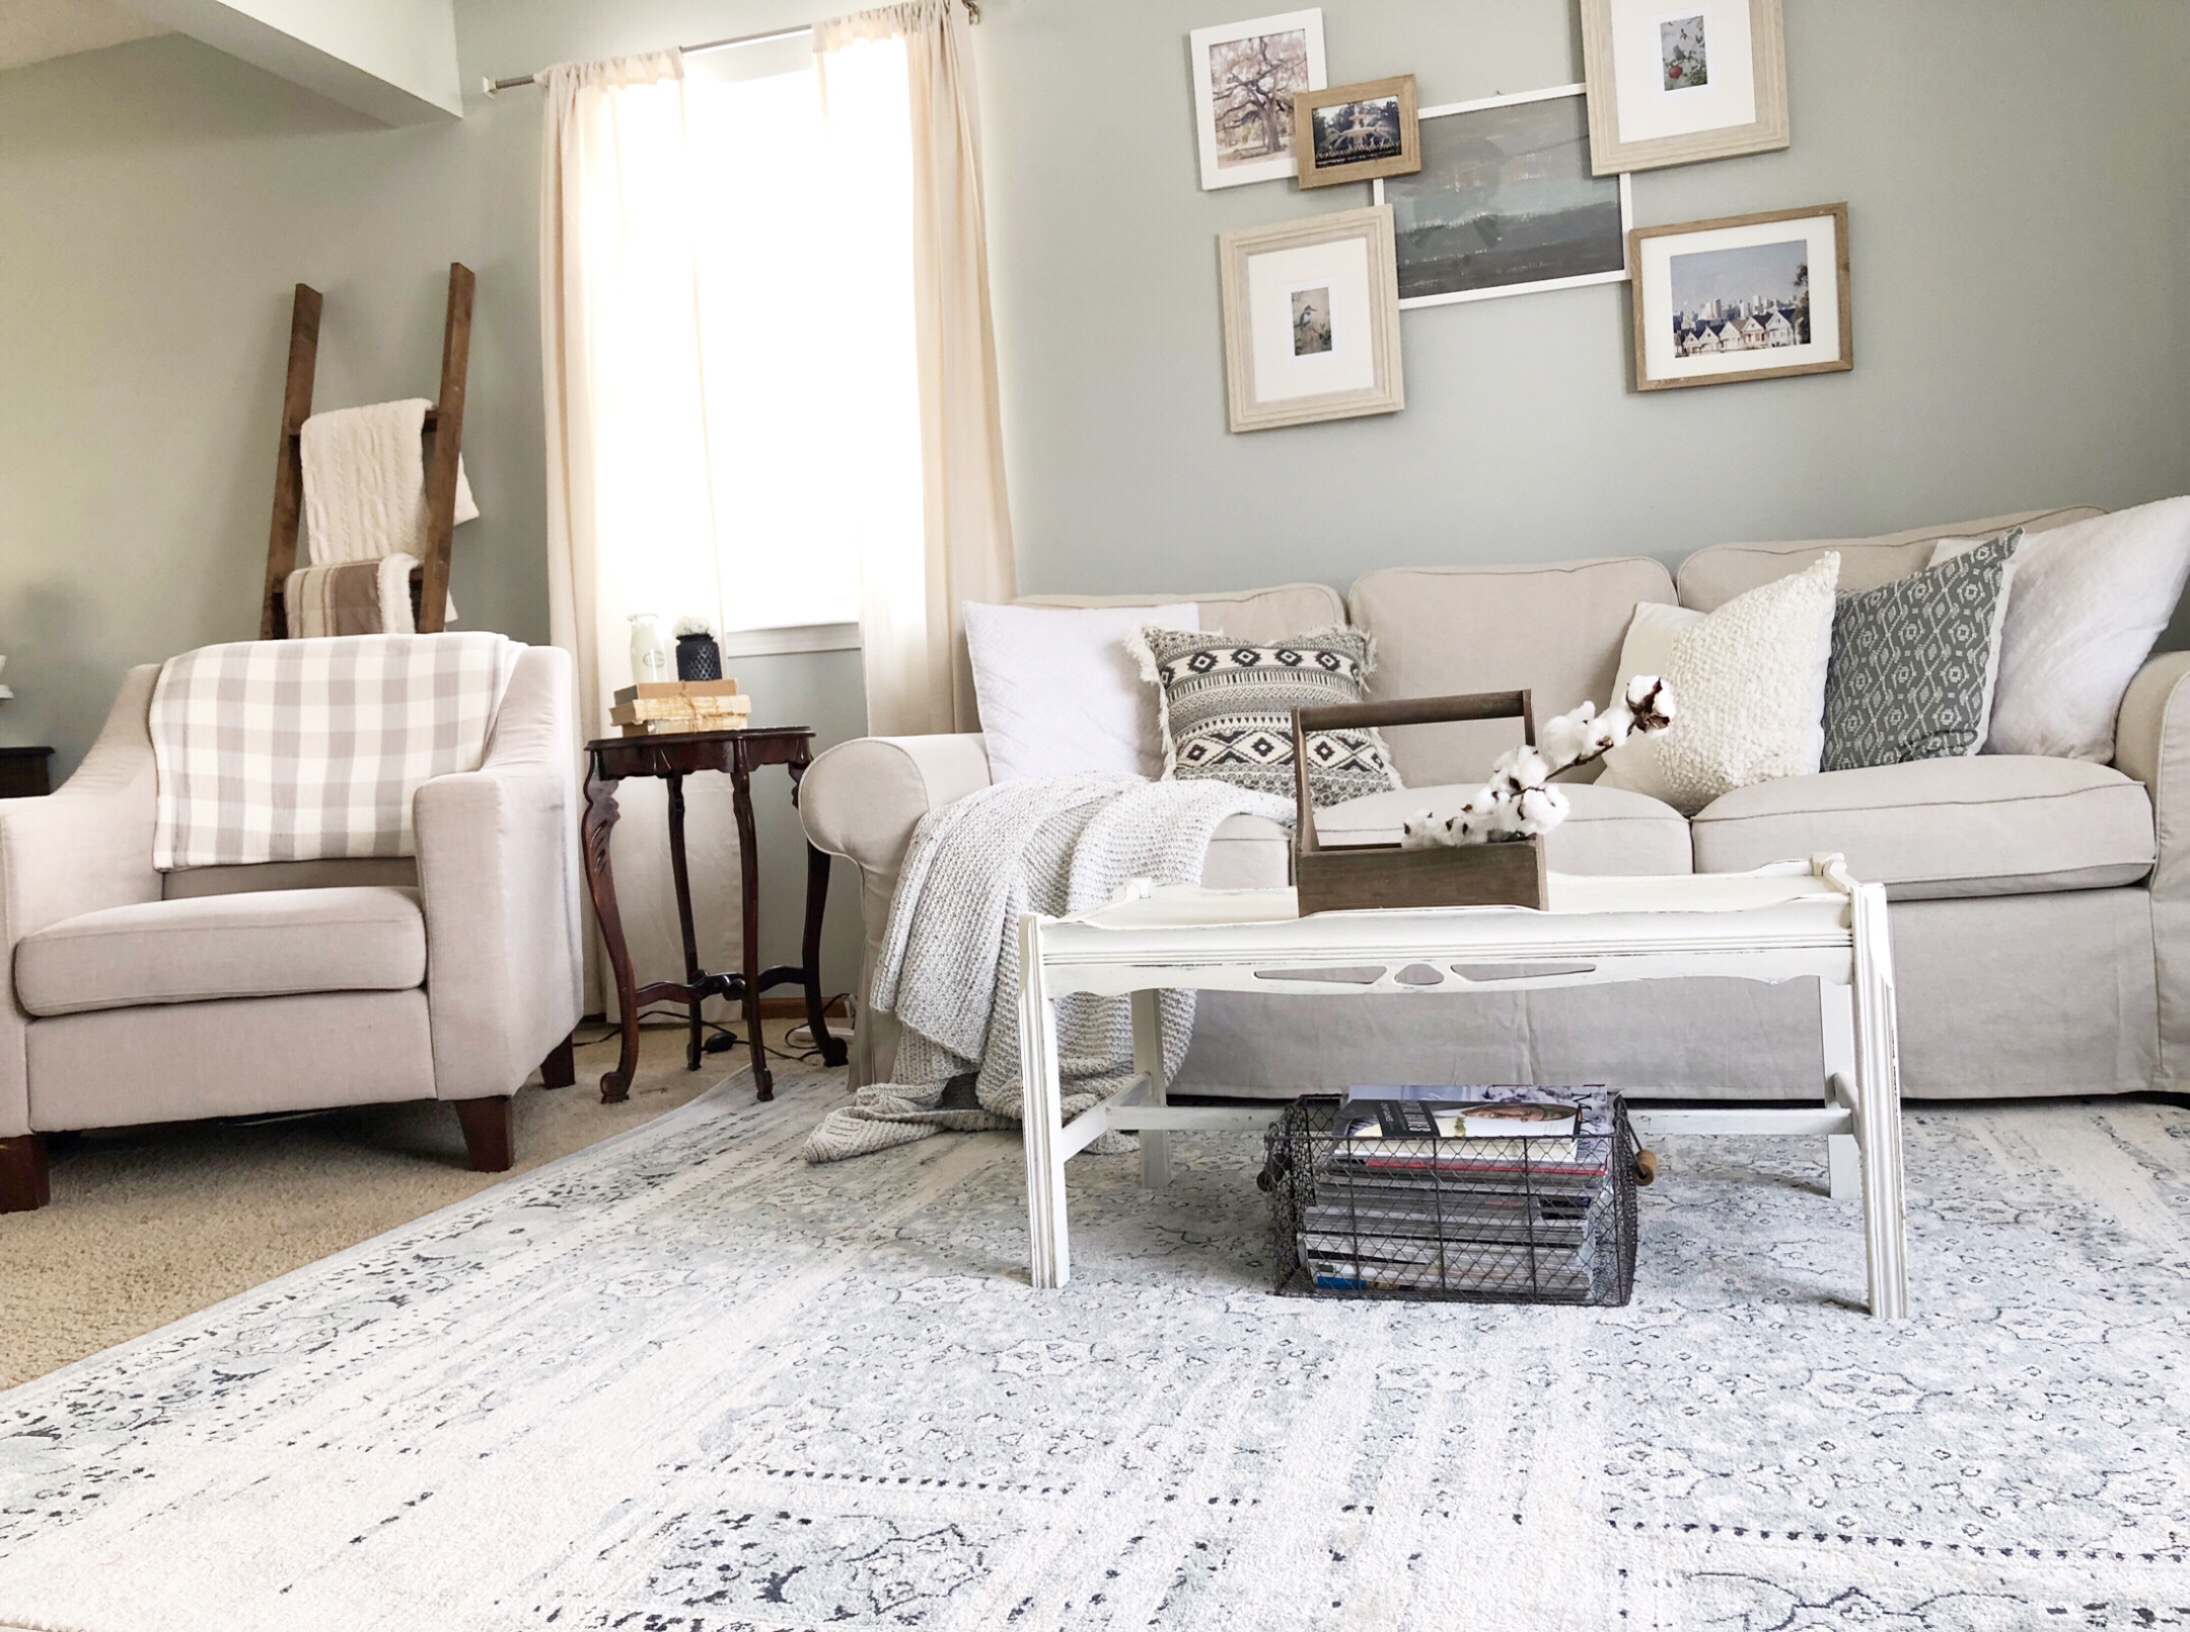
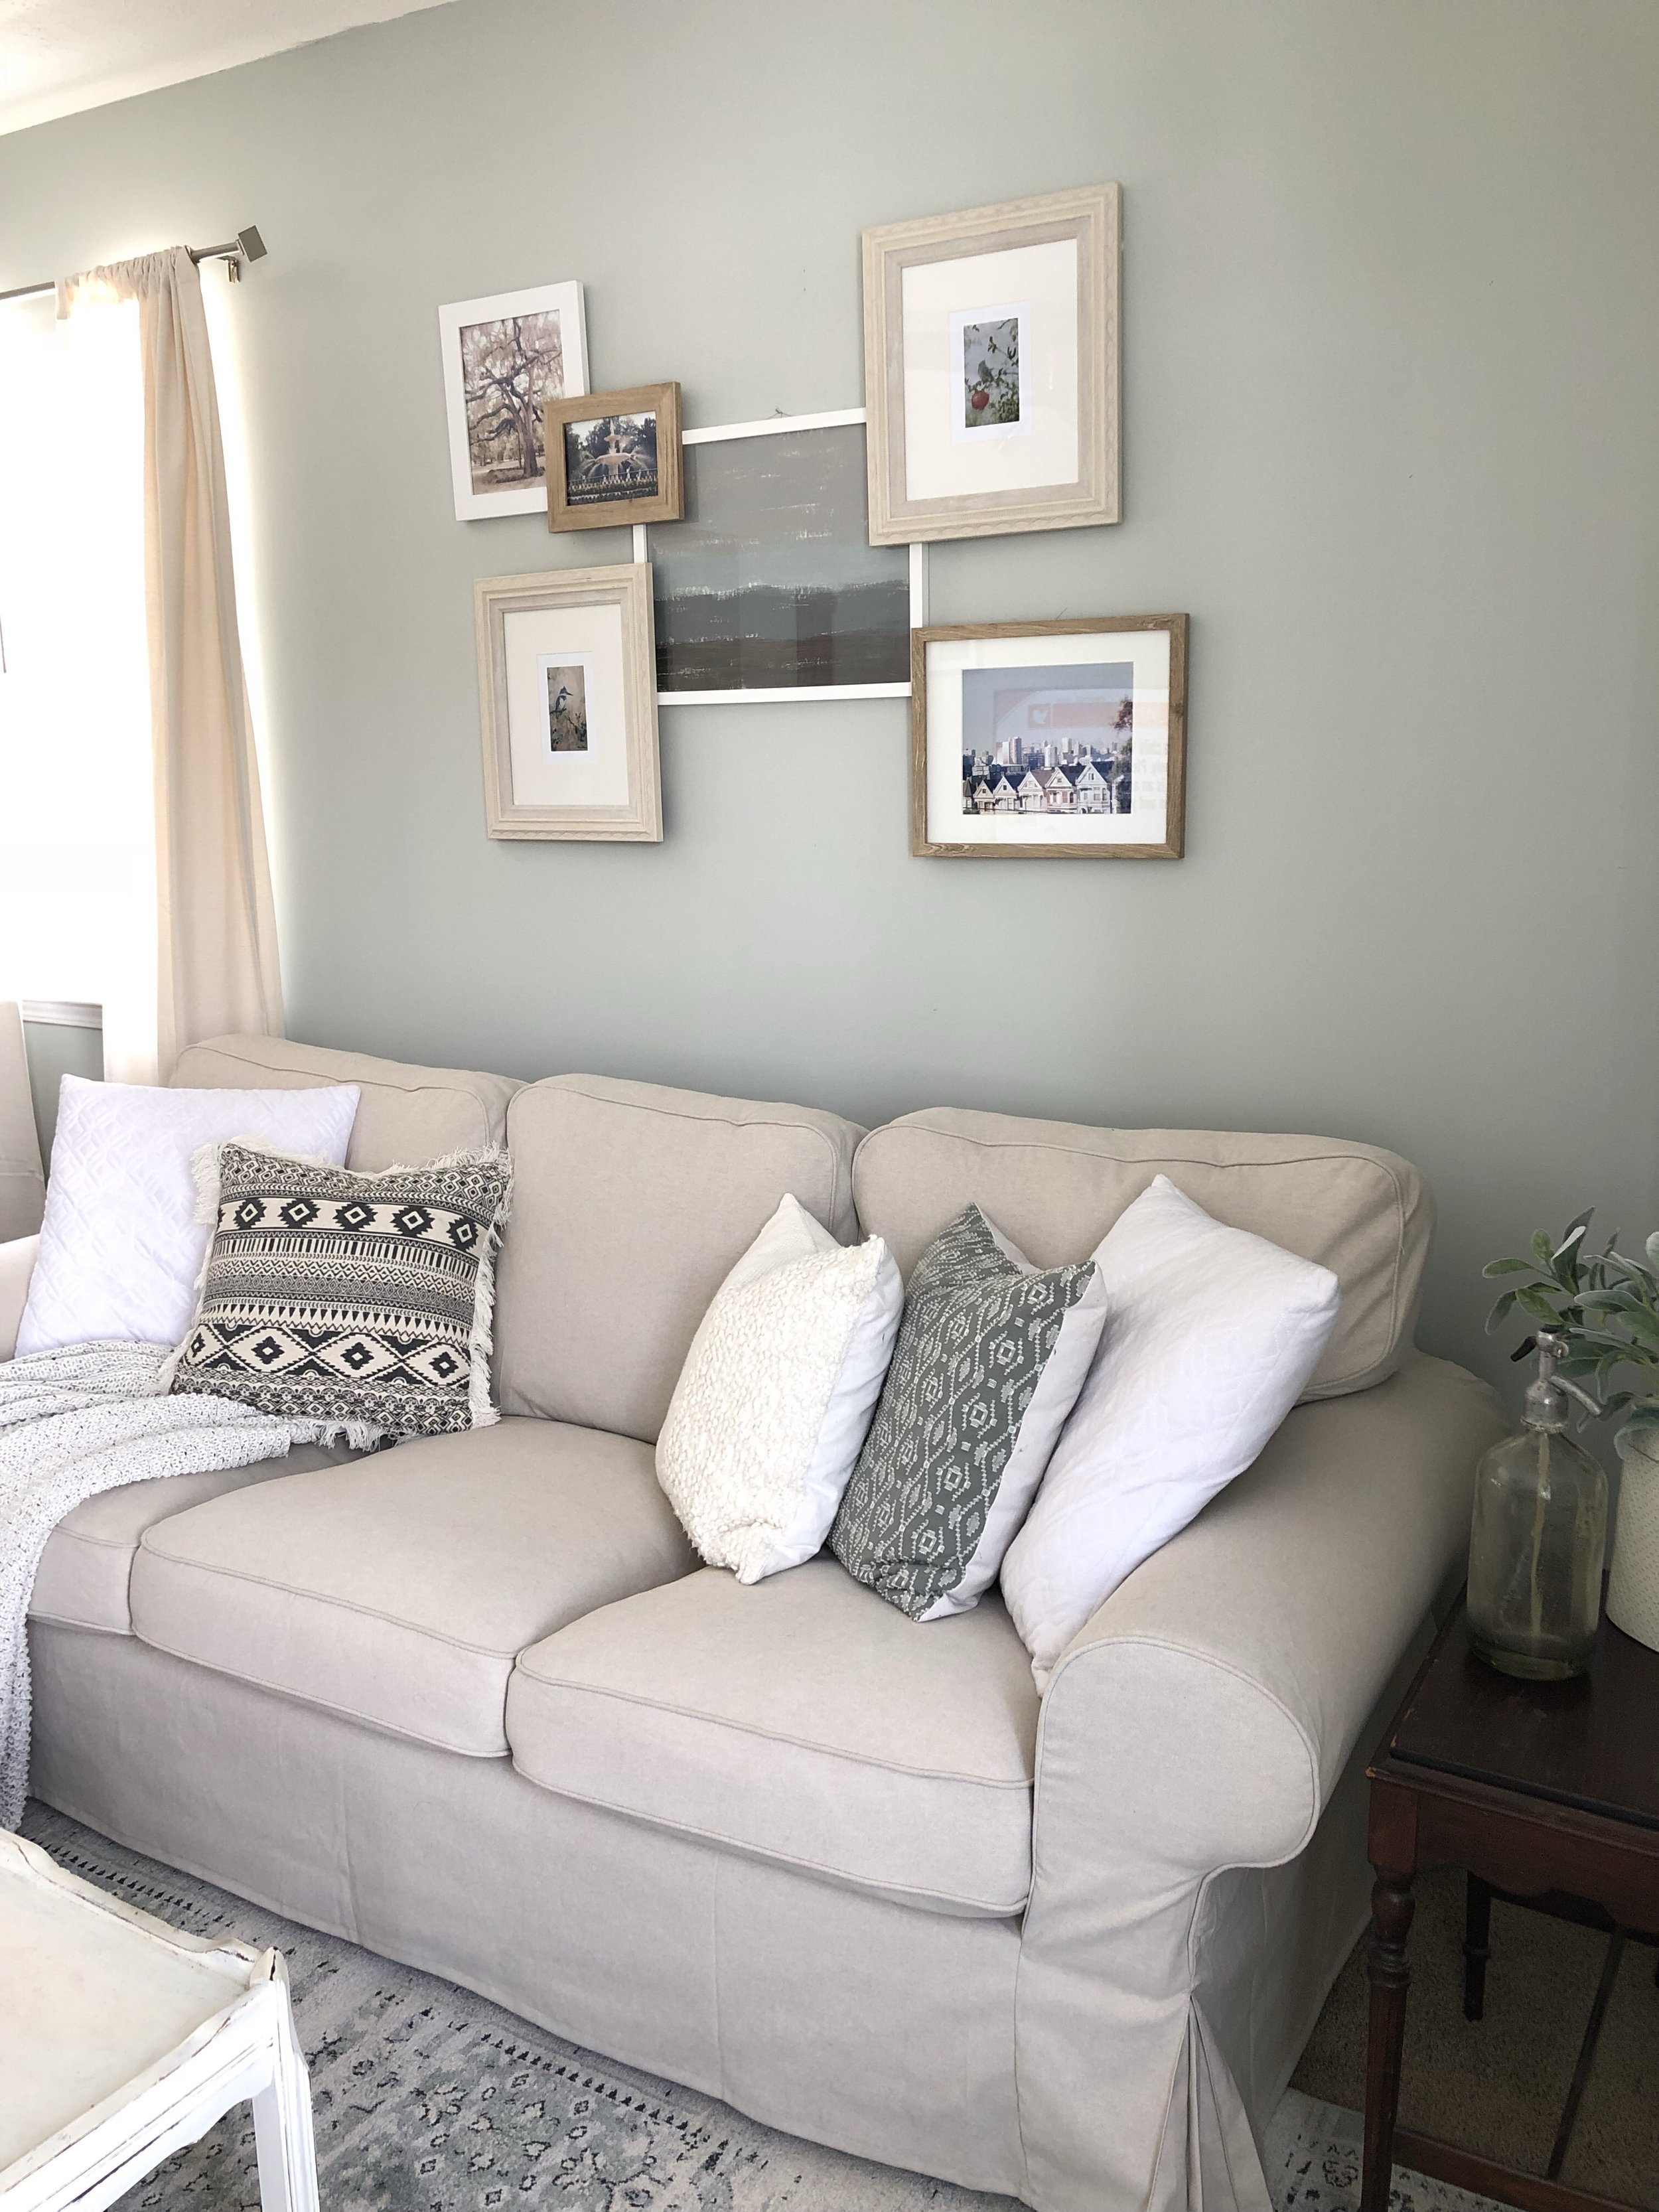
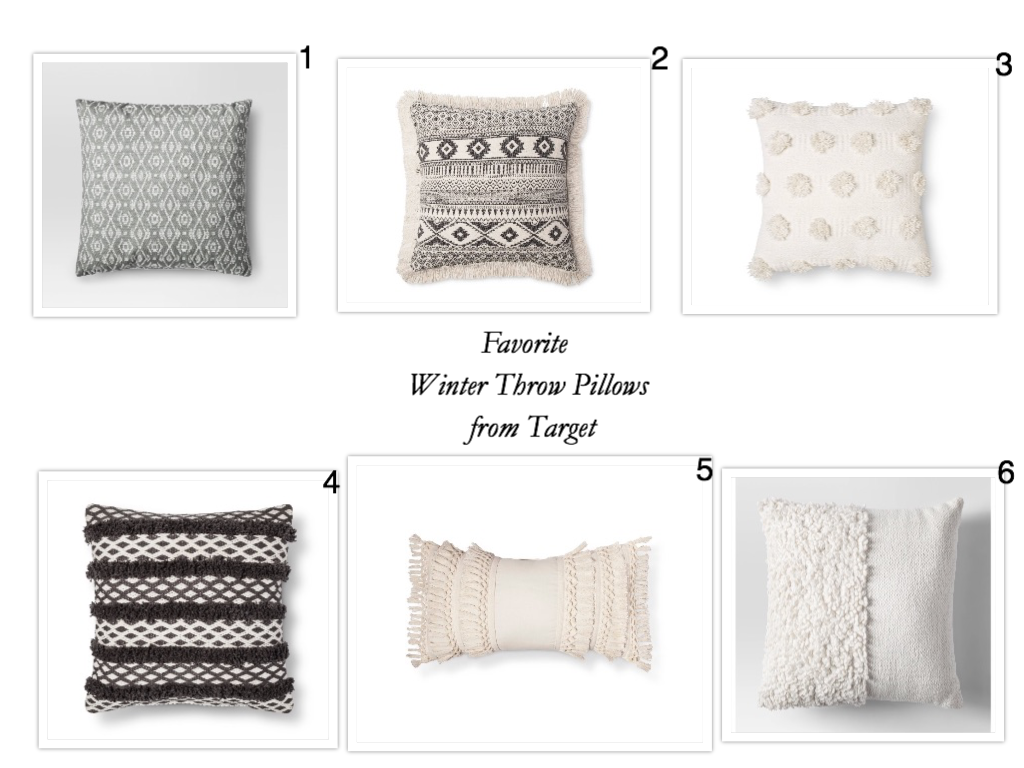
I love the way it turned out! This rug was one of my picks from this post, and I couldn't be happier with it! It's the perfect combination of blues, grays, and creams. It's really soft, too! It's not a super high pile, so it's not too plush, but it's so soft under our feet. 

As for our Ikea sofa, we still love it! I talked about my first impressions of it here. We still love the look and feel of it. It's perfect for our living room. 

For the wall behind the couch, I had a few things in mind, but I'm so happy I went with this layered gallery wall. It was easy and relatively inexpensive. Three of the photos are ones we took in California when we lived there, and then in Savannah when we went there on vacation. I love that the photos mean something to us. The middle picture was a DIY I did and I love the way it turned out. It was also really easy and inexpensive. 

I'm so happy with the way this room turned out. I love light and bright spaces, and this is definitely that. I'm looking forward to adding pops of color in the coming seasons. 

I hope you enjoyed seeing our living room makeover! If you have any questions about anything in the pictures let me know! I'd be happy to answer any!

Thanks for reading!


6 Makeup Must - Haves

I want to veer a little bit from my typical design posts and talk about my six must have makeup items. I love reading these from other bloggers, so I hope you do too!

When it comes to my daily makeup routine, I like to keep things relatively simple. I don't like to spend a lot of time on my everyday makeup, so I've searched for items that would help me accomplish a put-together look without taking up my whole morning. Here are the items I've found that I always grab for day after day. 

6 Makeup Must-Haves

First is face primer. I recently started using this primer (within the last few months, I'm actually almost out) and I really like it! I will say, I don't notice any reduction of my pores, but it does make my foundation go on smoother and last longer. So, for me that's a win. 

Next is foundation. I have  been using this L'Oreal Infallible Pro-Matte foundation for almost a year. I love it. I've try the glow one and I think it made me break out. So, the pro matte is my go-to. It goes on nicely and with the primer it really lasts all day. 

Eyeshadow primer is something I never thought I needed. Until I tried it. Now, I'm hooked. I got this sample size of Too Faced Shadow Insurance and I love it. It goes on nicely and makes my eyeshadow more pigmented and makes it last without creasing. It's a must now for me. 

That leads me to this eyeshadow palette. I got this for my birthday and use it everyday. It is the perfect combination of peachy colors. There are pinks and browns and nudes. Everything I could want in one palette. Plus it smells good! It smells like peaches! Win! 

After the eyeshadow I put on my mascara. I've been hooked on Too Faced Better Than Sex mascara, but it's pretty pricey. So, my mom recommended this alternative that has been compared to the Too Faced one. I have to say, I love it! It's  L'Oreal Voluminous Lash Paradise and is only about $5 at Target. That's a win to me!

Finally, my last must have is this Too Faced Chocolate Soleil Bronzer. I got this in a sample kit awhile ago, and I'm still loving it. It goes on nice and matte so I'm not all shimmery, which is perfect for winter. And, it smells like chocolate! Who wouldn't want their makeup to smell like chocolate? 

There you have it. My six makeup must-haves. These are the six makeup products that help me get ready quickly in the mornings, while still helping me to look put together. 

If you have any questions or if you've tried any of these products let me know in the comments!

Thanks for reading!

If you like this post, you should check out Friday Favorites and Best Dry Shampoo

Bathroom Reveal

It's time to finally reveal our full bath remodel! I'm so excited to share the final product with you all. We worked so hard on it, when I say we I mean my husband, and I love the way it turned out! Here is the storyboard I created for the full bath. 

Bathroom Storyboard

Here's a refresh on what the bathroom looked like before. 

And here is the bathroom now!

I absolutely love the way it turned out! It is exactly what I had in my mind. 

I really wanted to incorporate some copper, since it's so popular right now, and I thought this was the perfect space to add some touches of it. It's not overwhelmingly copper, but I used some glass canisters with copper accents, and a copper trash can. I also wanted to add in some black accents. As you can see from the rest of my home I love black accents. I used black wire baskets under the vanity and on one of the shelves, which also have some black accents, a black toilet paper holder, and some black hooks. I think the black really pops against the light walls. 

We had to add new vanity feet because the ones that came with it didn't feel very sturdy and it made the vanity too tall. So, we got these vanity legs from Home Depot and painted them white to match the vanity. 

Speaking of the vanity, man this thing caused some problems. As I just mentioned, the vanity legs were not sturdy at all and actually broke a little bit while we were trying to stand it up. It was also really tall. We aren't super tall people and the space isn't very big so the tall vanity seemed out of place in our bathroom. Also, the vanity top doesn't sit completely on the vanity. It pretty much sits on only the corners. We used an adhesive to attached it so it's secure, but I would prefer it to be touching all four sides of the vanity top. Overall I love the way the vanity looks. It was a good price, and I think it shows in the quality of it. But it does work and looks great in the space. 

I am so happy with the way the bathroom turned out! John did such a great job with everything! He is so awesome with executing all of my design dreams and making them look better than I imagined. 

I hope you enjoyed seeing the before and after pictures of this bathroom remodel. Let me know what you think of the end result in the comments!

Thanks for reading! 


Sources:

Vanity

Mirror

Light

Floor

Shelves

Hooks

Toilet paper holder (Similar)

Faucet


Banana Oat Chocolate Chip Cookies

These cookies are so good and so easy! I'm talking five ingredient easy. They are a healthy alternative to chocolate chip cookies and they taste really good! 

Banana Oat Chocolate Chip Cookies

Here's what you'll need:

2 bananas, slightly over ripe

1 cup oats (I used old fashioned oats but you could probably use quick oats too)

1/4-1/2 cup chocolate chips

1 tsp. vanilla

sprinkle of cinnamon


Directions:

Mash up the bananas in a bowl with a fork. Add the oats and combine. Add in the vanilla and cinnamon and then mix in the chocolate chips. 

Scoop onto a cookie sheet and bake at 350 degrees F. for about 15 minutes or until the edges start to brown. 

Remove and place on drying rack and enjoy! 

I keep these in the fridge to stay fresh. 

Banana Oat Chocolate Chip Cookies


I hope you enjoy these 5 ingredient cookies. Let me know if you try them in the comments!

Thanks for reading!

Favorite Winter Throw Pillows from Target

With redoing our living room, one of my favorite parts is getting new pillows. It's a great way to bring new life to a room. It's easy and inexpensive. I wanted to share with you the pillows I picked along with some other favorites of mine. 

Favorite Winter Throw Pillows from Target


1. 2. 3. 4. 5. 6

I got 1, 2 and 6 for our living room and so far I love them. All of these pillows are neutral and have some added texture. I mentioned in my post about how to decorate for winter (here) that neutrals and texture are a great way to add some winter coziness to any space. 

I hope this helped you get some inspiration for adding some easy style to your space. When you want to add some new design to a room, it can be as easy as new accessories, like throw pillows. If you would like some extra design guidance, check out my storyboards under e-design. I have a storyboard for accessories that is a great option for anyone who wants to refresh a room without getting new furniture of big pieces. If you are interested in learning more about e-design check out these posts here, here and here

Thanks for reading!